The Server Connection Wizard can add, change, or remove a Server Repository from Loupe Desktop. The Desktop client can connect to multiple server repositories at the same time, each showing up in the repository tree view on the left.
What does the Wizard Do?
It maintains a secure connection between the user repository on a computer and a remote Loupe Server. To do this, you'll need to know:
- What type of Server you're using: You can use the Loupe Service, operated by Gibraltar Software, or your own private Loupe Server.
- User Credentials: To connect with a server you'll need a user name and password with access to the repository you're connecting to.
Running the Wizard
The wizard can be run from the Tools -> Connect to a Server menu item in the Loupe Desktop.
Step 1: Select the Server Type
Select whether you want to connect up to the Loupe Service or to a private Server. You'll need different configuration information based on these options.

Step 1: Select the server Type |
To understand what's offered with the Loupe Service, see Loupe Server - Cloud-Hosted.
Step 2: Subscribe to the Server
If you selected to use the Loupe Service in Step 1, you'll get the following screen:

Step 2: Subscribe to the Gibraltar Loupe Service |
You need to know your Loupe Service Name (which uniquely identifies your team to the Loupe Service) and a user & password already set up on your service.
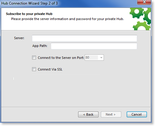
If you selected to use a Private Server in Step 1, you'll get the following screen:

Step 2: Subscribe to your Private Hub |
You'll need to know the connection information for your private Server:
- Server: The full DNS name of the web server where the Server is hosted.
- App Path: If your server is not hosted in the root directory of the web site you'll need to provide the virtual directory. If it's hosted in the root directory this can be left blank. Neither leading or trailing slashes (/) need to be provided.
Additionally, if your Server supports SSL it's recommended you check the Connect Via SSL option for the most secure connection. SSL provides additional protection by encrypting the Loupe session data flowing over the connection.
If your web server is operating on an unusual port (other than port 80 for Http or 443 for Https) then you will also need to specify the correct port by checking the Connect to the Server on Port option.
Step 3: Applying Changes
Once you've provided all of the connection information the wizard will attempt to contact the Server and verify the information you've provided. If it can't connect, you'll get an error and not be able to continue. If the server information is valid but the password is not valid then a Password dialog will be displayed.
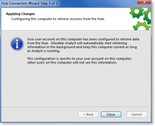
Once the connection is successfully established you'll see the following screen that provides some useful information about how the connection will work.

Step 3: Applying Changes |
Removing or Changing your Connection
You can remove or change your connection using the same wizard.